TEMPLATE SPECIAL JOB PORTLET
About

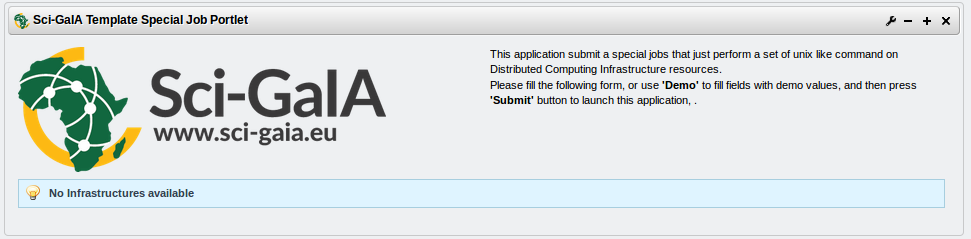
The template-special-job-portlet consists of a portlet example able to submit special jobs towards different kinds of Distributed Computing Infrastructures (DCIs). This portlet template contains the relevant elements needed to deal with DCIs, it has been developed in the contest of the Sci-GaIA project to support the application development process during the Sci-GaIA Winter School The aim of the template-special-job-portlet is to provide an application template that Science Gateway developers can customize to fit their own specific requirements. To make easier the customization process, a customize.sh bash script is included inside the source code package.
The template-special-job-portlet handles three different kinds of special jobs, a user can choose among:
- Job Collection: is a simple parallel application that spawns N sub-jobs; when all these are successfully completed the whole collection becomes DONE.
- Workflow N1: is a parallel application that spawns N sub-jobs, waits until all these are correcly completed and then submits a new job whose input files are the outputs of the N sub-jobs. When also this “final job” is successfully executed, the whole Workflow N1 becomes DONE.
- Job Parametric: is a parallel application that spawns N sub-jobs with the same executable and wi
Installation
This section explains how to deploy and configure the template-special-job-portlet.
1. Move into your Liferay plugin SDK portlets folder and clone the template-special-job-portlet source code through the git clone command:
git clone https://github.com/csgf/template-special-job-portlet.git
2. Now, move into the just created portlet folder and execute the deploy command:
ant deploy
When the previous command has completed, verify that the portlet was “Successfully
autodeployed”, look for a string like this in the Liferay log
file under $LIFERAY_HOME/glassfish-3.1.2/domains/domain1/logs/server.log.
3. Then, open your browser and point at your Science Gateway instance and form
there click Add > More in the Sci-GaIA category, click on Add button to
add this new portlet. Following picture shows the correctly result:
As soon as the portlet has been successfully deployed you have to configure it using the portlet configuration menu. Portlet configuration is splitted in two parts: Generic application preferences, Infrastructures preferences.
Generic application preferences
The generic part contains:
Application Identifier the identifier assigned to tha application in the GridInteractions database table.
Application label (Required) a short meaningful label for the application.
Production environment a boolean flag that specify if the portlet will be used in a production or development environment.
- if true the development environment preferences will be shown
- UserTrackingDB hostname hostname of the Grid and Cloud Engine Usertracking database. Usually localhost
- UserTrackingDB username username of the Grid and Cloud Engine Usertracking database user. Usually user_tracking
- UserTrackingDB password password specified for the Usertracking database user. Usually usertracking
- UserTrackingDB database Grid and Cloud Engine Usertracking database name. Usually userstracking
Application requirements the necessary statements to specify a job execution requirement, such as a particular software, a particular number of CPUs/RAM, etc. defined using JDL format.

Note
You can get the Application Idetifier inserting a new entry into the GridOperations table:
INSERT INTO GridOperation VALUES ('<portal name>' ,'Template Special Job Portlet');
  -- portal name: is a label representing the portal name, you can get the
  -- right value from your Science Gateway istance.
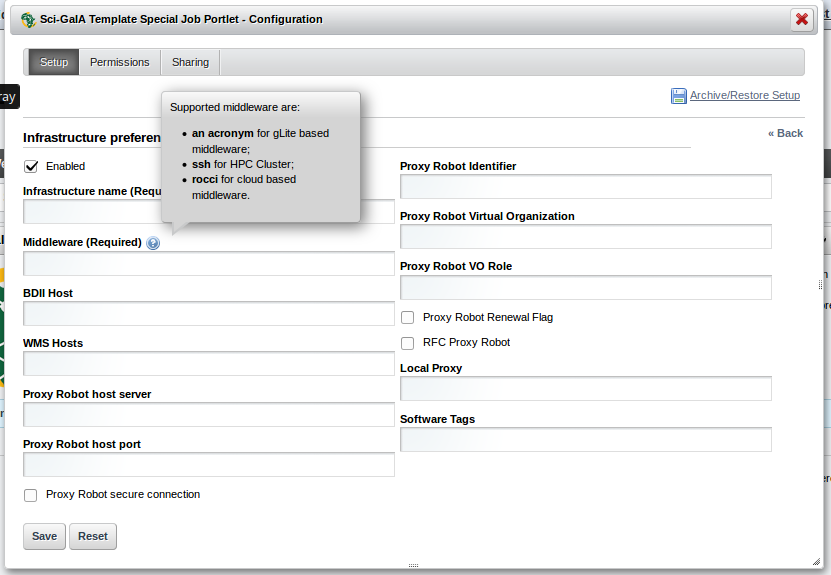
Infrastructure preferences
The infrastructure preferences section shows the e-Infrastructures configured. Using the actions menu on the right side of the table, you can:
- Activate / Deactivate
- Edit
- Delete
an available infrastructure. The Add New button is meant to add a new infrastructure available to the application. When you click this button a new panel, will be shown with several fields where you can specify the Infrastructure details.
The fields belonging to this panel are:
- Enabled A boolean which enable or disable the current infrastructure.
- Infrastructure Name (Required) The infrastructure name for these settings.
- Middleware (Required) The middleware used by the current infrastructure. Here you can specify 3 different values.
- an acronym for gLite based middleware.
- ssh for HPC Cluster.
- rocci for cloud based middleware.
Following fields will be traslated in the relevant infrastructure parameters based on the value specified in this field.
- BDII host: The Infrastructure information system endpoint (URL).
- If Middleware is ssh here you can specify a ”;” separated string with ssh authentications parameters (username;password or username for key based authentication).
- If Middleware is rocci here you can specify the name of the compute resource that will be created.
- WMS host: is the service endpoint (URL).
- Robot Proxy host server: the robot proxy server hostname.
- Robot Proxy host port: the robot proxy server port.
- Proxy Robot secure connection: a boolean to specify if robot proxy server needed a SSL connection.
- Robot Proxy identifier: the robot proxy identifier.
- Proxy Robot Virtual Organization: the virtual organization configured.
- Proxy Robot VO Role: the role virtual organization configured.
- Proxy Robot Renewal Flag: a boolean to specify if robot proxy can be renewed before its expiration.
- RFC Proxy Robot: a boolean to specify if robot proxy must be RFC.
- If Middleware is rocci this field must be checked.
- Local Proxy: the path of a local proxy if you want use this type of authentication.
- Software Tags: infrastructure specific information.
- If Middleware is rocci here you can specify a ”;” separated string with
<image_id>;<flavor>;<link_resource>
- If Middleware is rocci here you can specify a ”;” separated string with
Usage
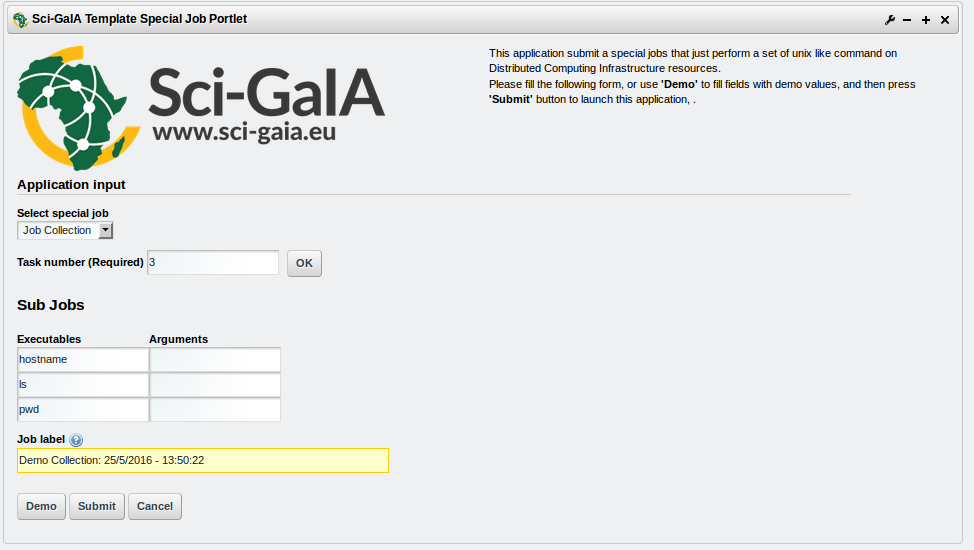
The usage of the template-special-job-portlet is really simple. The user has to specify the task number he wants like to perform, then he has to specify which kind of special job he wants execute from the provided combobox, then clicking on the OK button the interface will be automatically updated to show a set of input fiels that the user should fill with a unix like command and the arguments. futhermore the aèèlication provide a Demo button that allows to the user to submit a preconfigured Job Collection cosist of 3 sub-jobs.
Optionally the user can specify also a job label, that is a human readable label, used to idetify the job execution on DCIs, if he doesn’t specify any label a default one will be created with the username and a timestamp.
Contributor(s)
If you have any questions or comments, please feel free to contact us using the Sci-GaIA project dicussion forum (discourse.sci-gaia.eu)
| Authors: | Roberto BARBERA - University of Catania (DFA), Bruce BECKER - Council for Scientific and Industrial Research (CSIR), Mario TORRISI - University of Catania (DFA) |
|---|