Configuring the Grid & Cloud Engine on Liferay
Prerequisites
Check java version using the following command:
[liferayadmin@centos6 ~]$ java -version
java version "1.7.0_79"
OpenJDK Runtime Environment (rhel-2.5.5.3.el6_6-x86_64 u79-b14)
OpenJDK 64-Bit Server VM (build 24.79-b02, mixed mode)
the version installed should be 1.7, if you have installed a previous one, please update it before to proceed.
As root user, download the vomsdir.tar.gz
[root@centos6 ~]# mv vomsdir /etc/grid-security/
Create the directory (as liferayadmin)
[liferayadmin@centos6 ~]$ mkdir /tmp/jobOutput/
MySQL Server Configuration
Remeber that you need to configure the database. You can do that following Configuring the MySQL Database for the Grid & Cloud Engine
Grid & Cloud Engine Installation
Before starting the installation make sure your liferay domains is stopped.
[liferayadmin@centos6 ~]$ /opt/glassfish3/bin/asadmin stop-domain liferay
Waiting for the domain to stop ......
Command stop-domain executed successfully.
Dependencies
Download Grid & Cloud Engine and JSAGA libraries from here
Unzip GridEngine_v1.5.9.zip:
[liferayadmin@centos6 ~]$ unzip GridEngine_v1.5.10.zip
copy the extracted lib folder under the liferay domain folder:
[liferayadmin@centos6 ~]$ cp -r lib /opt/glassfish3/glassfish/domains/liferay/
Configuration
LogFile
Download the attached GridEngineLogConfig.xml link, and move this file to the Liferay config folder:
[liferayadmin@centos6 ~]$ mv GridEngineLogConfig.xml \
/opt/glassfish3/glassfish/domains/liferay/config
Glassfish Configuration
Restart the Glassfish server and when the server is up access the web administration console:
fill with username liferayadmin and the password you set for the glassfish administrator and create the required resources.
JNDI Resources
Select Resources -> JNDI -> Custom Resources from left panel. Then on the right panel you can create the resources by clicking the New... button.
- Create GridEngine-CheckStatusPool with the following parameters [1]:
JNDI Name: GridEngine-CheckStatusPool
Resource Type: it.infn.ct.ThreadPool.CheckJobStatusThreadPoolExecutor
Factory Class: it.infn.ct.ThreadPool.CheckJobStatusThreadPoolExecutorFactory
- Additional Properties:
- corePoolSize: 50
- maximumPoolSize: 100
- keepAliveTime: 4
- timeUnit: MINUTES
- allowCoreThreadTimeOut: true
- prestartAllCoreThreads: true
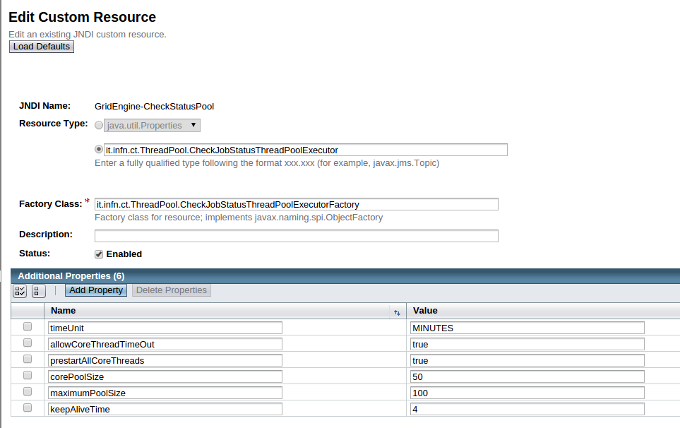
GridEngine-CheckStatusPool JNDI Resource
- Create GridEngine-Pool with the following parameters [2]:
JNDI Name: GridEngine-Pool
Resource Type: it.infn.ct.ThreadPool.ThreadPoolExecutor
Factory Class: it.infn.ct.ThreadPool.ThreadPoolExecutorFactory
- Additional Properties:
- corePoolSize: 50
- maximumPoolSize: 100
- keepAliveTime: 4
- timeUnit: MINUTES
- allowCoreThreadTimeOut: true
- prestartAllCoreThreads: true
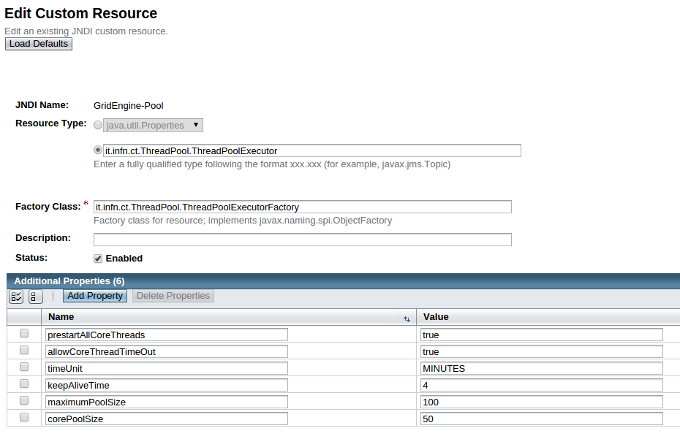
GridEngine-Pooll JNDI Resource
- Create JobCheckStatusService with the following parameters [3]:
JNDI Name: JobCheckStatusService
Resource Type: it.infn.ct.GridEngine.JobService.JobCheckStatusService
Factory Class: it.infn.ct.GridEngine.JobService.JobCheckStatusServiceFactory
- Additional Properties:
- jobsupdatinginterval: 900

JobCheckStatusService JNDI Resource
- Create JobServices-Dispatcher with the following parameters [4]:
JNDI Name: JobServices-Dispatcher
Resource Type: it.infn.ct.GridEngine.JobService.JobServicesDispatcher
Factory Class: it.infn.ct.GridEngine.JobService.JobServicesDispatcherFactory
- Additional Properties:
- retrycount: 3;
- resubnumber: 10;
- myproxyservers: gridit=myproxy.ct.infn.it; prod.vo.eu-eela.eu=myproxy.ct.infn.it; cometa=myproxy.ct.infn.it; eumed=myproxy.ct.infn.it; vo.eu-decide.eu=myproxy.ct.infn.it; sagrid=myproxy.ct.infn.it; euindia=myproxy.ct.infn.it; see=myproxy.ct.infn.it;

JobServices-Dispatcher JNDI Resource
JDBC Resources
Now you have to create the required JDBC Connection Pools. Select Resources -> JDBC -> JDBC Connection Pools from left panel. On the right panel you can create the resources by clicking the New... button.
- Create UserTrackingPool with the following parameters:
- General Settings (Step 1/2) see [5]:
- Pool Name: UserTrackingPool
- Resource Type: select javax.sql.ConnectionPoolDataSource
- Database Driver Vendor: select MySql
- Click Next
- Advanced Settings (Step 2/2) [6]:
- Edit the default parameters in Pool Settings using the following values:
- Initial and Minimum Pool Size: 64
- Maximum Pool Size: 256
- Select all default Additional properties and delete them
- Add the following properties:
Name Value Url jdbc:mysql://sg-database:3306/userstracking User tracking_user Password usertracking - Click Finish
Please pay attention to the Url property, *sg-database* should be replaced with the correct Url of your database machine. You can check if you have correctly configured the Connection Pool by clicking on Ping button, you should see the message Ping Succeded, otherwise please check your configuration.
UsersTrackingPool JDBC General settings
UsersTrackingPool JDBC Advanced settings
Finally, you have to create the required JDBC Resources. Select Resources -> JDBC -> JDBC Resources from left panel. On the right panel you can create the resources by clicking the New... button.
- Create jdbc/UserTrackingPool with the following parameter [7]:
- JNDI Name: jdbc/UserTrackingPool
- Pool name: select usertrackingPool
jdbcUsersTrackingPool JDBC Resource
- Create jdbc/gehibernatepool with the following parameter [8]:
- JNDI Name: jdbc/gehibernatepool
- Pool name: select usertrackingPool

jdbcgehibernatepool JDBC Resource
Finalize installation
From the left side menu, select Applications, find and check marketplace-portlet on the rigth panel and click the Disable button
Now, restart glassfish to finalize installation.